- Головна
- /
- Стаття

Додавання пристрою під керуванням партнера
 У цій статті
 Надіслати відгук?
Адміністратори підприємства можуть додавати та керувати пристроями сторонніх виробників з Control Hub. Ви можете запускати різні рішення та вибирати їх для налаштування пристроїв Webex Calling.
Початок роботи з пристроєм, яким керує партнер
Ви повинні вручну налаштувати пристрої та володіти обліковими даними для автентифікації SIP. Ви несете відповідальність за будь-яке шахрайство, спричинене через нездатність захистити ці облікові дані.
При додаванні сторонніх SIP-пристроїв застосовуються такі технічні характеристики:
-
Призначте користувачеві пристрої, якими керує партнер. Також ви можете призначити кожен пристрій кільком користувачам.
-
Усі пристрої сторонніх виробників повинні підтримувати вимоги Webex Calling Security. Див. Вимоги безпеки для Webex Calling.
-
Існують мінімальні вимоги до прошивки. Перегляньте документацію сторонніх розробників для отримання детальної інформації.
Щоб керувати пристроєм партнера, запросіть спеціальний доступ до інтеграції керування пристроями у ваших облікових записів.
Додати пристрій, яким керує партнер, до користувача
| 1 |
Увійдіть у Центр керуваннята перейдіть до розділу . Ви також можете додати пристрій до користувача з розділу «Користувачі», перейшовши до > виберіть користувача > . |
| 2 |
Виберіть Особисте використання, щоб призначити пристрій користувачеві, а потім натисніть Далі. |
| 3 |
Введіть ім’я користувача або фактичне ім’я власника телефону, виберіть користувача з результатів і натисніть Далі. |
| 4 |
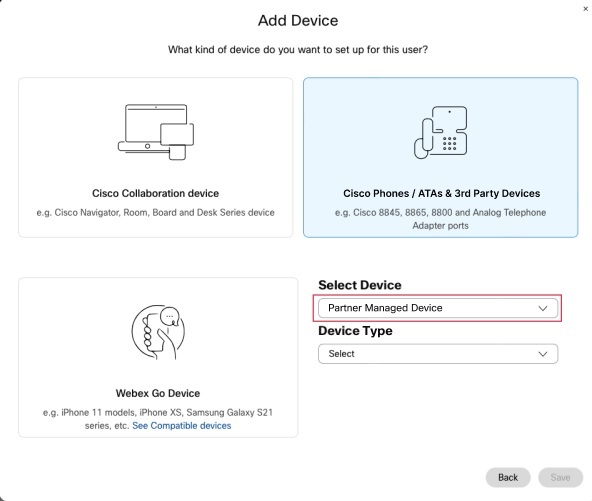
Виберіть телефон Cisco, ATA або пристрій стороннього виробника. |
| 5 |
Виберіть Пристрої, керовані партнерами у розкривному меню Вибрати пристрій. |
| 6 |
Виберіть тип пристрою з випадаючого меню Тип пристрою. |
| 7 |
Введіть наступні дані, пов’язані з пристроєм:
Наразі ви можете додавати схвалені SIP-пристрої та не можете додавати несхвалені пристрої. |
| 8 |
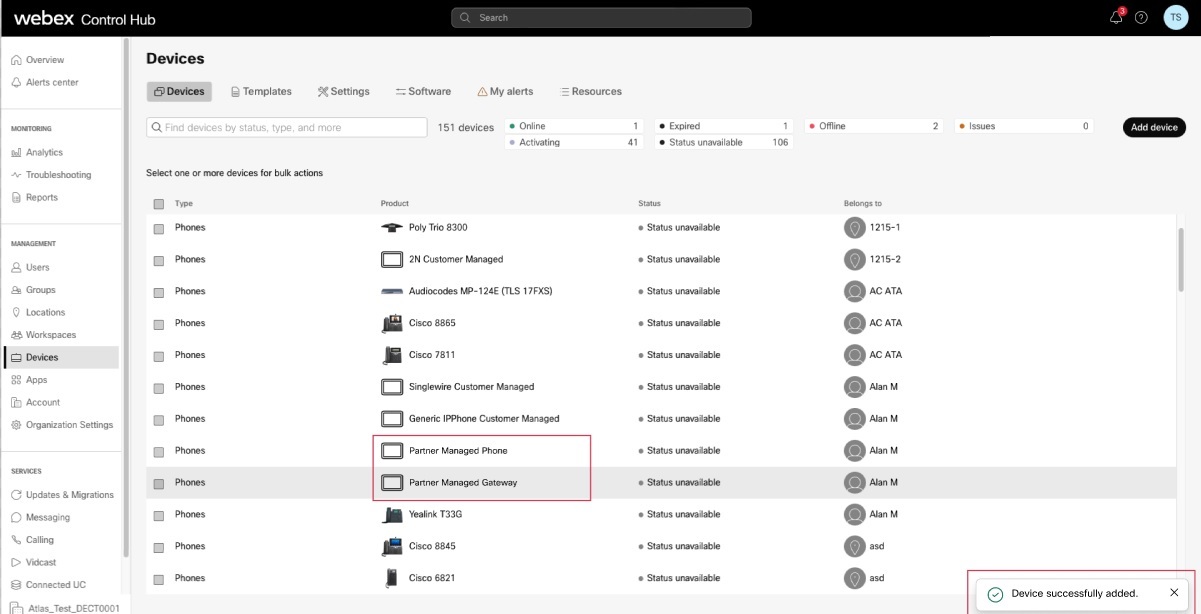
Прочитайте застереження та натисніть поле підтвердження. Потім клацніть Зберегти. Тепер ви можете переглянути пристрій у списку пристроїв.
Ви можете додавати та керувати партнерськими пристроями масово за допомогою API. Докладніше див. у розділах Огляд пристроїв та Огляд викликів Webex. |
Додати пристрій, керований партнером, до нової робочої області
Перш ніж почати
- Ви можете додати до робочої області з професійною ліцензією на робочу область до 5 пристроїв, якими керують партнери.
Ви можете додати кілька пристроїв до професійного робочого простору лише зі сторінки нового робочого простору. Щоб використовувати нову сторінку робочого простору, потрібно увімкнути «Спробувати нові робочі простори » у верхньому правому куті сторінки робочого простору.
- Ви можете додати лише один пристрій до робочої області з ліцензією на робочу область загального користування.
| 1 |
Увійдіть у Центр керуваннята перейдіть до розділу . Ви також можете додати пристрій до нового робочого простору з розділу «Робочі простори», перейшовши до . |
| 2 |
Виберіть . |
| 3 |
Введіть назву робочого простору (наприклад, назву фізичної кімнати), виберіть тип кімнати та додайте місткість, а потім натисніть Далі. Назва робочої області не може містити більше 30 символів і не може містити %, #, <, >, /, \, та "символи". |
| 4 |
Виберіть телефон Cisco, ATA або пристрій стороннього виробника. |
| 5 |
Виберіть Пристрої, керовані партнерами у розкривному меню Вибрати пристрій. |
| 6 |
Виберіть тип пристрою з випадаючого меню Тип пристрою. |
| 7 |
Введіть наступні дані, пов’язані з пристроєм:
Наразі ви можете додавати схвалені SIP-пристрої та не можете додавати несхвалені пристрої. |
| 8 |
Прочитайте застереження та натисніть поле підтвердження. Потім натисніть Далі. |
| 9 |
Клацніть службу Виклик та виберіть тип підписки й ліцензії, які потрібно призначити робочій області.
Щоб дізнатися більше про функції, доступні з ліцензіями, див. Функції, доступні за типом ліцензії для Webex Calling. |
| 10 |
Призначте розташування і номер телефону (визначається вибраним розташуванням), а потім клацніть Зберегти. Також можна призначити додатковий номер. Якщо ви хочете додати додаткові пристрої до професійного робочого простору, ви можете зробити це одним із наведених нижче способів.
|
Скинути пароль SIP для пристрою, яким керує партнер
| 1 |
Увійдіть у Центр керуваннята перейдіть до розділу . |
| 2 |
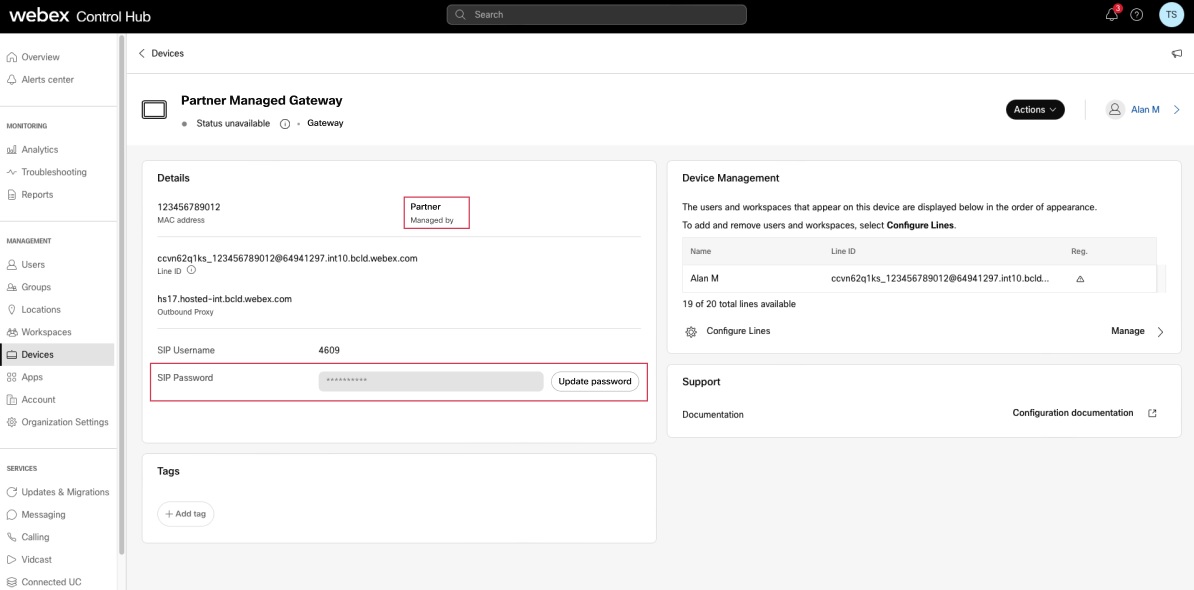
Виберіть партнера, який керує device/gateway. |
| 3 |
У розділі «Деталі» натисніть «Оновити пароль».
|
| 4 |
Натисніть Оновити, щоб підтвердити пароль. Ваш щойно згенерований пароль відображається в полі. |
Адміністратор цього пристрою несе відповідальність за підтримку цих облікових даних. Це останній раз, коли ви можете переглянути пароль повністю. Скопіюйте та збережіть цю інформацію для власних записів та використання в майбутньому.


 у стовпці

